other Zoom resources …
Screen Sharing – overview and other resources
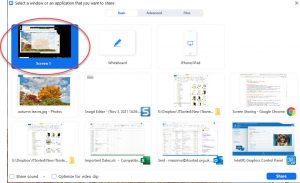
Overview of sharing your screen
- Click the “Share Screen” button (usually at the bottom of the screen)

- Click on the window to share and click the blue “Share” button (bottom right) OR simply double-click the window

- At this point, everyone can also see that screen (there may be a short delay for some people)
- You will see a menu (usually at the top of your screen). Using that you can now
- Start a New Share (and pick a different Window)
- Stop Sharing

4 min video overview from Zoom https://support.zoom.us/hc/en-us/articles/201362153-Sharing-your-screen-in-a-meeting
Things you can do
- You can share any window / part of a window / audio / videos
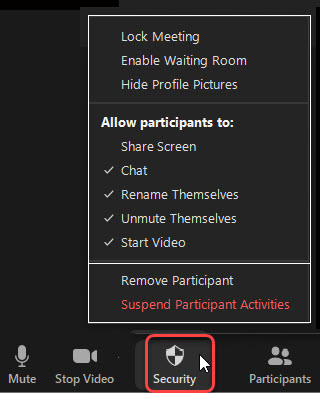
- You can limit who can share their screen
Things you may not know
- NEW FEATURE: you can now screen share into all open Breakout Rooms (more info coming – for now Google ‘zoom screen share in breakout rooms’).
- You can share a blank “Whiteboard” that you and others can write on
- You and/or anyone can write on/mark any shared screen (e.g. mark where they come from on a map that you share)
- You can save any screen you share (including the whiteboard) as a picture/screenshot
- People can choose how much of their screen is taken up by your screen share, and how much by people’s videos
- You can show people how to use Zoom by sharing your Zoom window itself – there’s a setting for this
- You can share just audio (music in the background)
- If you have a video downloaded on your computer you can screen share it using the ‘Advanced Tab’ and then choose ‘Video’ and select the file
Tricks not provided by Zoom (but explained below)
- How to hide toolbars in Word / zoom your screen – so people see more of the content you want them to
- Ideas for alternatives to the Whiteboard and Annotate (can be a bit clunky)
Limitations to be aware of
- If you share your Screen (rather than a Window) and you move around it, people will see all this – use “Pause Share” to avoid this
- Sharing audio (music or video) will come out distorted for people – unless you tick the right box
- Singing or playing an instrument over Zoom will also come out distorted – unless you tick some other boxes
- Annotate (writing on the screen) works differently on different devices
 On a Mac and unable to screen share and/or get this message? …
You will need to give special permission for Zoom to share your screen.
It takes 3 – 5 minutes – follow these instructions from Zoom and/or watch this short (under 2 mins) video
Below are all the other things you need to know and can do with Screen Sharing …
Screen Sharing topics
While in a meeting, you can share the following content:
- Entire desktop or phone screen
- A specific application (or Window)
- A portion of your screen
- Whiteboard
- Audio from your speaker
- Video stored on your computer
- Video from secondary camera
- iPhone/iPad screen

If you have an extra monitor you will see two “screens” (as in the example above).
The difference between sharing a ‘Screen’ or a ‘Window’
- If you share a “Screen” or desktop, you can switch between windows and applications and people see it all.
- If you share a “window”, the screen sharing will only show that window. In fact, if you then close that window, screen sharing stops.
Whatever you share will be surrounded by a thin green rectangle.
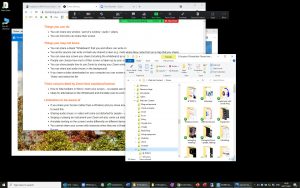
Sharing SCREEN
This is your entire desktop (or “Screen”) … and everything in it … from the very top to your “taskbar” at the very bottom. So people will be able to see everything on your screen. And, as you switch between windows/programmes, they will see that as well.

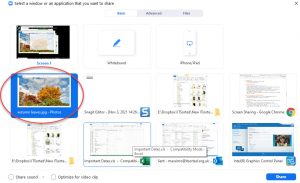
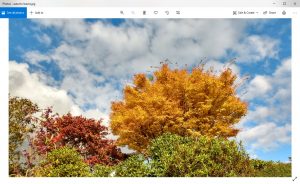
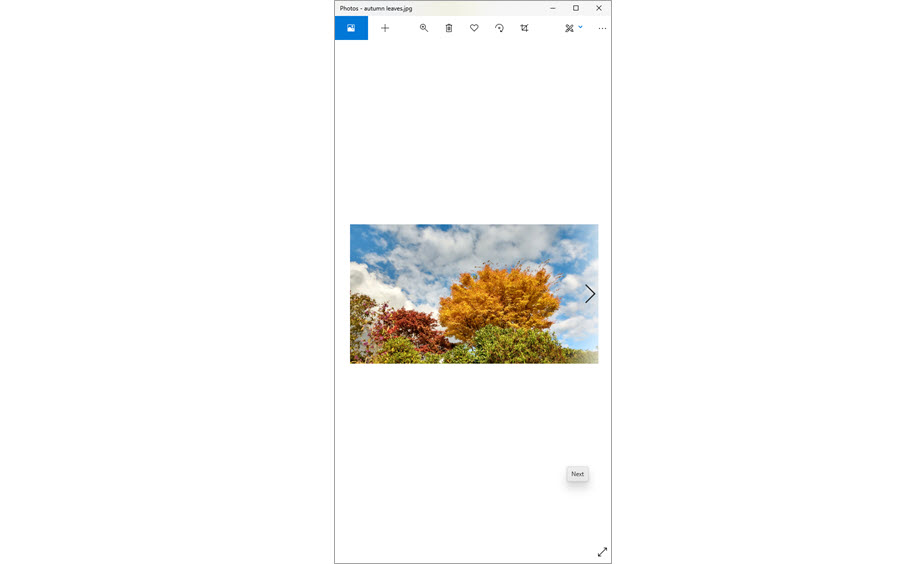
Sharing a specific Window
This is a single document, open in a single “Window”. So a Word document, or an Excel document, or a PowerPoint slideshow, or a browser (Google, Safari, FireFox etc) showing a web page or showing a YouTube video, or a photo/picture on your computer (as in this example).
And they will see just that window – even if you overlap it on your screen with other windows
Settings available in the web (in your account) via a browser

Settings available (in your account) during the meeting
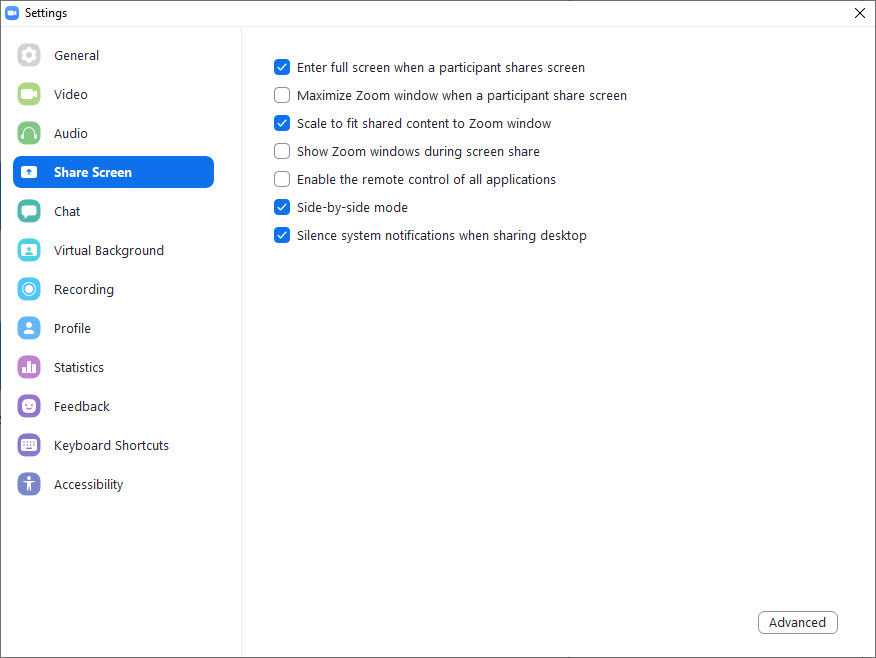
Settings for Screen Sharing available during a Zoom meeting

Think Landscape – not Portrait
Computer screens are Landscape – so consider creating documents to share in landscape, to take up as much of screen as possible.
If sharing in Landscape, remind participants using tablets and phones to turn their devices on their side to make the most of their screen.

Fit the surrounding window to the image
Set up the Window that contains your document (image, Word, Excel, video) so that it fits (as best you can) exactly what you want to share …


So when it is displayed on participants’ screens it looks it’s best …


How to move and resize your windows
VIDEO for PC: move and resize windows for PC [3 min] – only watch until 3.10 (anything after this is unnecessary and advanced)
VIDEO for Mac: move and resize windows for Mac [4 min] – only watch until about 3 min (anything after this is about more advanced tricks)
VIDEO for Mac: move and resize windows for Mac [4 min]
“Zoom” your image to make it the right size to share
Use the “View” menu (if the program has one) to zoom into the bit you want to share
GENERAL TIP: To scroll up and down through a document (Word, Excel, Web page) you can use: your “mouse wheel” or two fingers on your pad (other methods on different devices)
ZOOM TIP: To “Zoom” in and out of screens hold down the “Ctrl” key (or “Cmd” key for Macs) and then “scroll up/down” (as described above). This will “Zoom” in and out.
Display full screen
Use “full screen mode” when possible – so your content takes up all the screen – PDFs, Word and some browsers (Google Chrome, Safari etc) allow you to do this
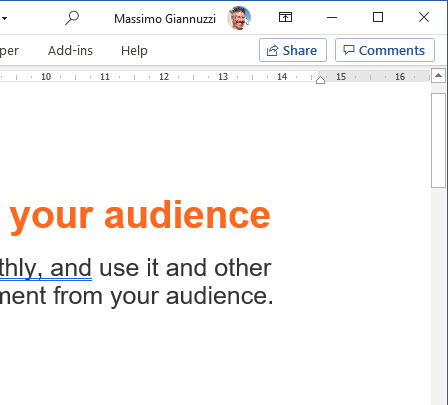
Hide the “Ribbon” on Office programs


Share just a “region” of your screen
For part of a document or if you have a large resolution screen
- Click ‘Advanced’ Tab
- Click ‘Portion of Screen’
- Click ‘Share’
- You’ll now see a green rectangle …
- click-and-drag the top to move it round your screen
- click-and-drag the edges to change it’s size
 The view of the person doing the Screen Sharing
While screen sharing (from a Mac or Windows computer/laptop), video of the other participants will move to an adjustable video panel.
Note: If you can’t see the video panel, click the ‘More …’ button on your menu and click ‘Show Video Panel’.
You can move this video panel around and change the layout using the small buttons at the top (see image).
Help from Zoom on Video layout options while screen sharing
Participants view (tablets and phones)
If sharing in Landscape, remind participants using tablets and phones to turn their devices on their side to make the most of their screen.
Participants view (computers and laptops only)
They should initially see the screen share on the left, side-by-side with a grid of participants on the right …

And they can click and drag the dividing line between them, to make one or other take more screen space.
If the participants’ videos are along the top of their screen, they can click ‘View Options’ at the top of their screen (next to the green message – “you are viewing XXX’s screen”) and then click on ‘Side-by-side mode’ …
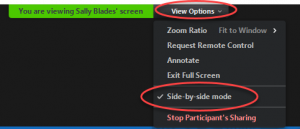
Help from Zoom on Side by Side Mode for Screen Sharing
If they still can’t see the dividing line, but the videos are down the right side (e.g. MacBook pro seemed to have this problem) – still get them to go click ‘View Options’ at the top of their screen (next to the green message – “you are viewing XXX’s screen”) and then click on ‘Side-by-side mode’
 Sharing a video stored on your computer (or connected device)
New as of Feb 2021
e.g. downloaded video, recorded on your phone
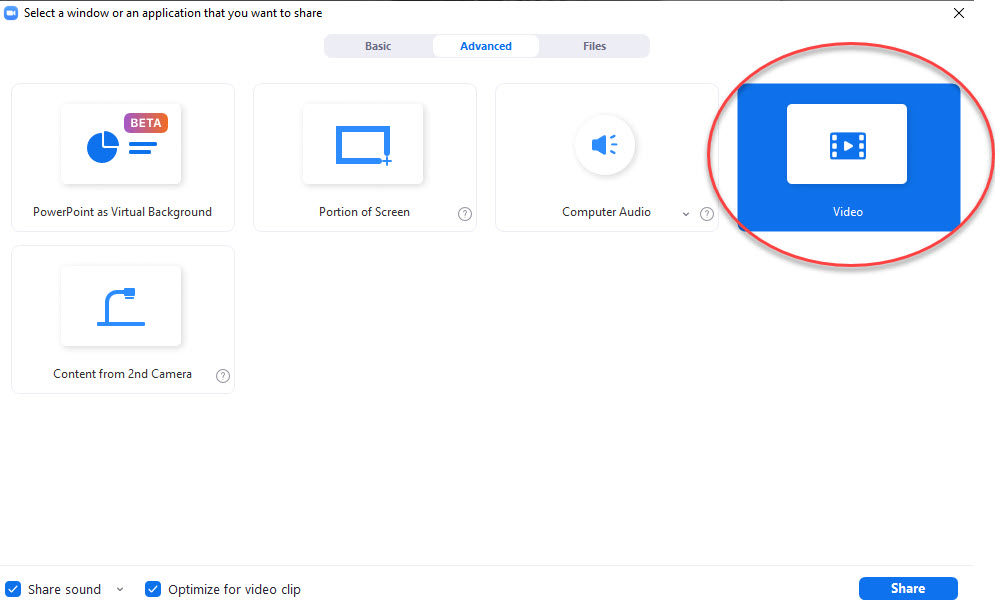
- Click on the ‘Advanced’ tab
- Click on ‘Video’ and ‘Share’ (or double-click on ‘Video’)
- Search for and open the video on your computer (or connected device – like USB stick)
- Participants will now see the video
- Adjust volume if necessary and press Play
This is MUCH simpler than opening the video in a video player on your computer, and then sharing that window (and remembering to turn on “Share computer sound” and “Optimise for video clip” – this feature does all this automatically)
Sharing a video on YouTube or Vimeo etc
See the next section for details of this
Sharing audio
e.g. YouTube video (where people don’t need to see the images), recorded sound file, downloaded music track
 Click on the “Advanced” tab at the top of the share screen page
Click on “Music or Computer Sound Only”
You do not need to (in fact cannot) turn on “Share computer sound” as described above, as it’s assumed to be needed by Zoom and is automatically enabled. This ensures that the sound gets sent directly from computer to computer.
Singing or playing an instrument
For this there is a different option called “Preserve Original Sound”
Built into Zoom is an “audio enhancement” feature that reduces background noise, cancels echo, and maximises the spoken voice (rather than the dynamic nature of music).
This feature is on by default, and though it’s excellent for regular conference calls, it adversely affects the quality of audio over Zoom calls.
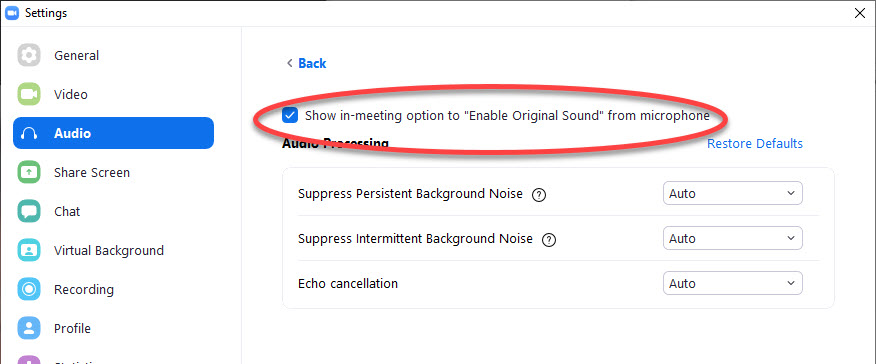 If it’s not on,
- Click on the up arrow next to your microphone icon on your menu
- Click on ‘Audio settings’
- Click on ‘Advanced’
- Turn it on (see image …)
Article on how to preserve original sound
Youtube: Optimize Zoom Audio Settings for a Remote Music Lesson [3:40 mins]
 YouTube and Vimeo videos are usually displayed in a window along with lots of other information and other video suggestions. And you just want to share the video itself.
So there are three ways of doing this.
- Share the video “URL” (or address) via the Zoom Chat and let everyone play the video on their own computers – you will have to Mute everyone for this otherwise everyone will hear the audio of everyone else’s video playing! [see yellow areas in picture]
- Share a “Region” of your window (that contains the video) [see green area in picture]
- Use “Full Screen” mode in YouTube or Vimeo and share your screen (this requires knowledge of how to switch between windows) [see red area in picture]
IMPORTANT: Whichever you choose, when you’re ready to share, make sure you turn on “Share computer sound” and “Optimise screen sharing for video clip” (the two tick boxes at the bottom left of the Zoom Screen Share window).
How to share the video URL
- Copy the URL or address from your ‘address bar’ at the top of your browser window (the yellow area in the picture above)
- Paste into Chat
- Remember to Mute everyone
How To Upload & Share YouTube Video On Zoom [2.50 mins] – the first part of this video shows you how to share the video URL with people via Chat
How to share just a region of your screen
How To Upload & Share YouTube Video On Zoom [2.50 mins] – the second part of this video shows you how to share just a region of your screen
- Click ‘Advanced’ Tab
- Click ‘Portion of Screen’
- Click ‘Share’
- You’ll now see a green rectangle …
- click-and-drag the top to move it round your screen
- click-and-drag the edges to change it’s size
How to turn on “Full Screen” mode in YouTube or Vimeo
Both of these players have a “Full Screen” button at the bottom right of each video (see button highlighted in red in the picture above)
And remember, to return to normal, press ‘Esc’ on your keyboard.
How to switch between windows/apps when in Full Screen mode
On a PC
Use the Alt+Tab key combination (while holding down the ‘Alt’ key, tap the ‘Tab’ key, once or multiple times, to see each window you have open in turn.
On a Mac
Use the Cmd+Tab key combination – while holding down the ‘Cmd’ key, tap the ‘Tab’ key, once or multiple times, to see each window you have open in turn.
Excellent video about switching between windows or Apps on a Mac [3.30 mins]
The whiteboard feature allows you to share a whiteboard that you and other participants (if allowed) can annotate/write/draw on.
The annotation tools will appear automatically, but you can press the Whiteboard option in the meeting controls to show and hide them.

Use the page controls in the bottom-right corner of the whiteboard to create new pages and switch between pages.

Note: Only the participant or host that started sharing the whiteboard has access to create and switch pages.
You can save the Whiteboard as a picture file and distribute it later.
When you are Screen Sharing, you (and others) can “draw” on the screen – this is called “Annotate” and displays an extra menu …

IMPORTANT: to return to controlling the screen – click “Mouse” on the far left of the Annotate menu
Warning when scrolling
Any marks you make with the annotate tool stay on the screen where you draw them. So if you scroll up or down or go to another page, the marks you drew stay in the same place on the screen. they do not scroll with the document.


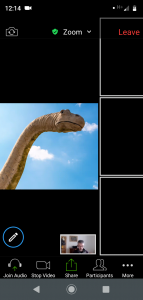
What it looks like on a Tablet or Phone
And below is what it looks like on a phone and on tablet (although larger of course).
People need to tap their screen to display the Annotate button (Pencil) and tapping this displays the Annotate menu
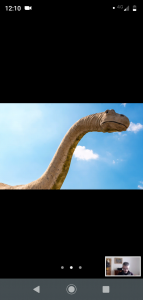


If people want to see the other participants during screen share, they can swipe left …

An example of using Annotate
… for “non-business purposes” – with my Grandson …

NEW FEATURE: you can now screen share into all the open Breakout Rooms (more info coming – for now Google ‘zoom screen share in breakout rooms’).

You can also share text and/or a link to an online document in Chat and people can then use copy and paste OR open the document and switch screens.
This might be a little complicated for some people – but hopefully one person in each room will be able to do this … and people can ask for Help from you if no-one in the room can do this.
See Breakout rooms for further details.