This page has some general help for managing WordPress websites. If you are a client of ours you should have a dedicated help page which you should look at first.
Most of you will now be using the ‘Block Editor’ which works differently from the old ‘Classic Editor’


Help for Block Editor
See this youtube video How to use the WordPress Block editor
Help for Classic Editor
FAQs (if you have a problem)
Enter starts a brand new ‘paragraph’ (with space between this and previous paragraph).
Shift+Enter starts a new ‘line’ (with no space between this and previous line).
Like this. Note: the new line is still part of the same ‘paragraph’ as the previous line.
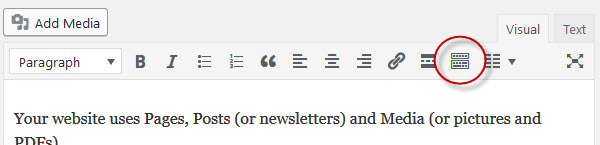
Missing part of Toolbar?
 If you can’t see the second line of toolbar – click on button as shown in picture …
Copy and paste
 When copying and pasting anything in, make sure the ‘Paste as Text’ button (clipboard with a white T in it) is clicked/selected. Otherwise you risk a lot of extra, hidden code coming in with it.
Formatting and Headings
The Toolbar allows you to choose options and formats. Bold is fine, but avoid Underline (reserved for links) and font colour (to keep site looking clean and consistent).
Choose ‘Style’ from drop down box on far left. Note: these affect a whole paragraph – so you don’t need to select the whole line/paragraph first – just click anywhere in it:
- Paragraph: normal text.
- Heading 1: generally reserved for title so avoid
- Heading 2, 3 and 4 can be used
More help
Video on Editing a Page in WordPress
Starts with editing a page or post (at 2.25) (also contains inserting an image at 5.25)
PDFs (along with images) are stored in the ‘Media’ section of your website.
You can upload new PDFs there and insert links to them in Pages and Posts.
Upload PDF
- Go to ‘Media’
- Click on ‘Add New’
- Either ‘Browse’ or click-and-drag image
View all existing PDFs
- Go to ‘Media’ – Library
- Enter PDF in the search box
Insert a link to a PDF
- Click where you want the link to go
- Use the ‘Add Media’ button just above your toolbar
- Choose your PDF (you can also upload new PDFs from here)
- Fill in the appropriate details:
- Title – what people will see (e.g. list of prices or click here to download list of prices)
- Link To: ‘Media file’
- Click ‘Insert into page’
You can finally choose whether the link opens in the same window/tab or in a new window/tab (my preference).
- Click on link
- Click on Pencil to edit link
- Click on Settings (cog image)
- Choose ‘Open in new Tab’
For example: click here to open ‘Tips for using Google’ PDF

Extra fancy
- You could take a screen shot of the PDF
- Upload it to your site
- Insert the image in place of the link
- Add a link (to the PDF) to the image (see image far right)
You can change the thumbnail facebook uses for a video. This image will be displayed when your video isn’t auto playing. You can select an auto-generated image, upload a custom image or choose a still frame from your video.
 Click on the video
- Click on the menu/three dots ‘…’ (bottom right?)
- Click on ‘Edit Video’ (see picture)
- On the next screen click ‘Thumbnail’ and you’ll see a number of options you can use to choose/create your own thumbnail …

The simple answer is yes.
And you can either pay us to handle this for you, or do it yourself. If the latter, then carry on reading …
Why do I need to keep my website updated?
Updates can fix bugs and add/improve features and functionality, but the most important reason is security. And let’s be clear about two things:
- If you’re careful, you are highly unlikely to have a security issue or breach
- But please take updates seriously, as the consequences can be severe – you might have to rebuild your entire website from scratch!
Updates can include ‘security fixes’ that protect your website from ‘holes’ discovered, new threats or hackers. Any of which may allow someone/something intrusive or destructive into your website, risking you losing part of or the entire website. In which case you may well have to build your entire website from scratch! That’s all the text, images, pages, designs, menus … all of it!
A useful short page https://optimwise.com/why-update-wordpress-and-plugins/

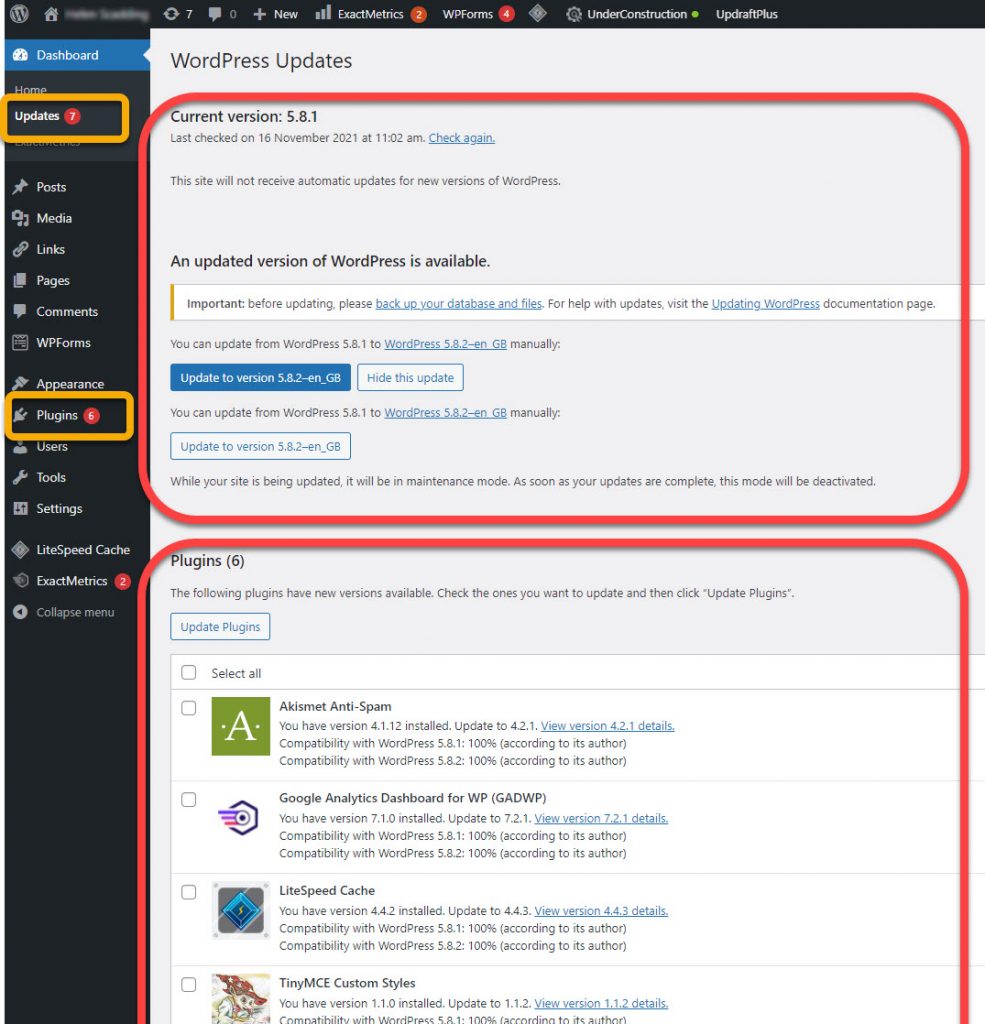
How will I know if there are updates available?
When you login to the ‘back end’ or ‘dashboard’ of your site. There will be messages displayed showing you updates are available.
To see if your Themes need updating go to ‘Appearance’ and then ‘Themes’

How often should I check for updates?
At least once a month.
What should I update?
WordPress, Plugins and Themes: whenever you see updates for these we recommend you install them.
Warning: Very occasionally, an update to WordPress can break one or more of your plugins (if the plugin developers weren’t following the best practices and coding standards). In fact, unfortunately, any update could cause problems – albeit very rarely.
The safest solution, is to take a backup of your site first, and then do your updates. However, as this can take a while and as you should be updating at least once a month, this can be laborious.
If you have hosting with us, we make sure that there is always a recent backup of your site available.
How do I update?
Simply follow the instructions from your dashboard.
Note, that while they are being updated, visitors to your site will not be able to view your site and instead be shown a Maintenance message …
Briefly unavailable for scheduled maintenance. Check back in a minute.
However, most themes and plugins take only a few seconds to update. If you’re concerned at all by this, pick a time you know your site will be less busy/likely to be accessed.
FAQs