All photos, images and PDFs will be stored in the ‘Media library’ of your website.
You can upload new images there, and then insert them into Pages and Posts.
You can insert individual images or sets of images in galleries.
What size images should I use? (a brief summary)
 Small images that will be inserted in a page (maybe to the left or to the right and with text wrapping around them – such as the one to the right here) don’t need to be large.
Pictures that are more crucial are:
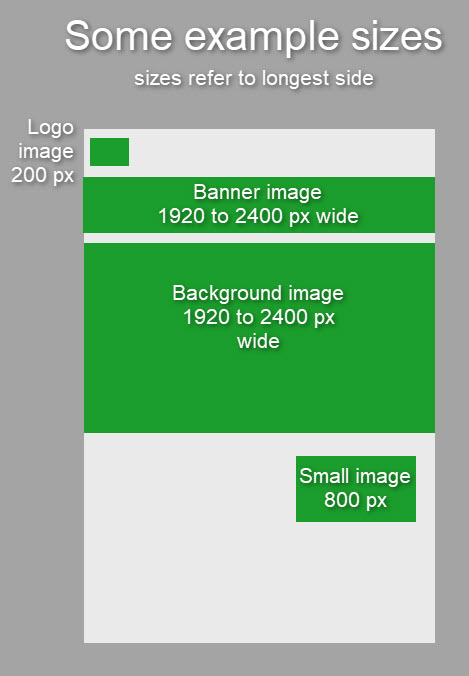
- the ones that stretch across the whole width of the page, such as the “banner” at the top of each page
- or what’s often called a “hero” image, which perhaps takes the whole screen when you first arrive at a website
- also, those strips that run across the whole width of the page on some home pages
These ideally need to be a minimum of 1600 to 3000 px wide. Otherwise, they can look blurry and unprofessional.
And remember that if only a certain part of the image is to be used, then it’s that bit that needs to match these minimum measurements, and not the whole width or height.
Where should I store them and how should I name them?
- Consider keeping all the images for your website in one folder on your computer (and ideally backed up).
- If you have a particularly large website, with many images, you might benefit from using multiple sub folders.
- Name each original image to help you identify them easily later on (especially if you come back to them after a year or two).
- Important: keep the original image on your computer untouched. Make any changes (like cropping or compressing) to a copy of it.
- Name your files before you upload them to your website. Choose descriptive names that will contribute to your SEO score.
SEO is search engine optimisation = being found by search engines like Google.
You can improve your SEO in many ways. One of which is by having images with sensible ‘File Names’, ‘Titles’ and ‘Alt Text’ entries. These should include phrases that people might be searching for.
So, for example, I have help pages for people using Zoom. The name of one of my images is “Zoom Breakout Rooms Mobile closing notice cropped” – so it will contribute to being found by people searching for “Zoom Breakout Rooms” or “Breakout Rooms on a mobile”.
The “cropped” on the end simply helps me know its been cropped from the original.
This is a very useful article on using images in your website and SEO
More detailed information on using images
What size should an image be?
Most websites, even with large pictures, load quickly. But you still need to be careful about image sizes. Basically, “large” images look great, but can take longer to load. If they are too slow people may move to another page or site. So upload the largest size you think you’ll need (but ideally, no larger than this).
A whole page image or a full width banner will need to be uploaded as a large file. Whereas an image that only ever sits in a small box on a page, can be uploaded as a smaller file.
Images have:
- file dimensions (width and height – in “pixels” or “px”) and
- a file size (kilobytes KB or megabytes MB). There are many programs that help you reduce the size, while maintaining as much quality as possible (e.g. photoshop, irfanview and many online ones).
What WordPress does for you
When you insert a picture from your Media library into a Page or Post, WordPress has a set of different (but fixed) sized copies, and uses the appropriate one depending upon where it is going to be used/what size you choose. So if you have uploaded a huge image and are just using it as a small version, a reduced size copy is inserted into the page and not the original.
Also WordPress helps/allows the browser that’s viewing your site to choose the correct size version, based on the space the image is taking on your page and the quality of the screen. So, for example, if you upload an image of 2400 px, most people will upload and see a smaller version, but people will higher quality screens may get the larger version.
Screen sizes most commonly used in 2021

 What size should I upload?
Below are some approximate guidelines (and don’t get hung up on these, unless your site is a commercial one – just slows loading of your page a little)
Largest: at least 1600 px x 1600 px, but not larger than 3000 px x 3000 px
WordPress will output your images in a format that allows the browser to choose the correct size based on the space the image is taking on your page and the quality of the screen. So just because you are uploading an image at 2000px, for example, most viewers to your site will see it in smaller dimensions and not have to load that large of an image, but you will still be supporting higher quality screens and different layout options.
- Full screen images [2400 pixels wide / 200 – 400kb]
- Banner images across the top [2400 pixels wide / 100 – 200kb]
- Smaller images within/next to text [800 pixels / 30 – 100kb]
- Featured images (used for Posts) [800 x 600 / 30 – 100kb]

Insert image into page
- Click where you want the top of the image to be
- Use the ‘Add Media’ button just above your toolbar
- Choose your media (you can also upload new images from here)
- Fill in the appropriate details
- Title – your chance to add sensible, short phrases that will help your SEO
- Alt Text – ditto for Title (this is used by screen readers for people with sight issues)
- Caption (optional) – appears underneath your image
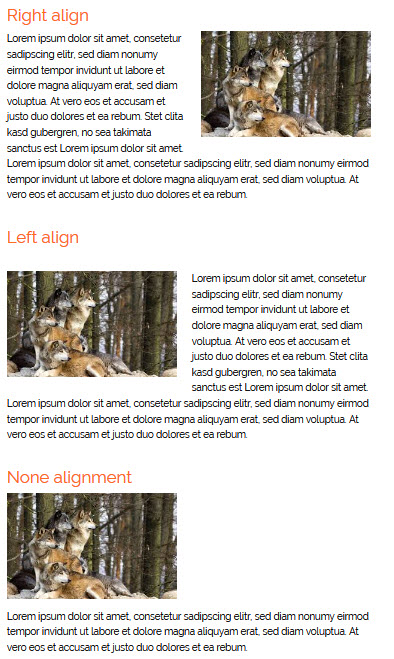
- Alignment: ‘Left or Right’ – will wrap text round the image. ‘None’ – puts image on its own with text above and below (but not wrapped around). Note you can then centre it on the page if you want.
- Link To: ‘None’ (other options ‘Media file’ = on click image opened over top of page / ‘Custom URL’ = on click goes to the URL you specify)
- Size: Avoid Thumbnail. You’ll get used to which size you want. And you can resize it once its inserted.
- Choose the smallest size (loads quickest) that you then reduce (if necessary).
- NEVER, expand an image as it will look grainy and poor quality.
- Click ‘Insert into page’
Image alignment
‘Left or Right’ – will wrap text round the image.
‘None’ – puts image on its own with text above and below (but not wrapped around). Note you can then centre it on the page if you want.
Editing an image once its been inserted
Click on image and then …
- Click and drag corner handles to change its size on the page
- Choose word-wrap alignment from menu that appears and if you choose ‘None’ you can then use alignment tools in main editing toolbar (see image)
- Click the ‘Pencil’ to Edit other aspects of image
