Click here if you’re looking for SpaceWorks live website
Overview
 To make any changes to your website you will need to login to your dashboard first (see Personal links at end)
You should be able to edit most of your website, but of course don’t hesitate to contact me if you need any further advice or support.
Your website uses (see picture far right):
- Posts (these are for your video tips)
- Media (pictures, videos and PDFs)
- Pages
- Appearance (where you can change nearly everything else including menus, footers etc)
 When you have logged in, you’ll see and ‘Edit Page’ button at the top of each page.
Alternatively, click in top left (see image) to take you to the Dashboard – then click ‘Pages’ – then find the page you want and click ‘Edit’
Click here for general help editing text, adding images, PDFs, links etc.
- Click on ‘Pages’
- Click on ‘Add New’
Refer to picture below for these
- [green] Page Title: enter a name for this page (this will appear in the green banner area)
- [yellow] Permalink: this is the page’s “address” or “URL” and what people will see at the top of their browser. So if it’s too long you can edit it to make it simpler. Most of the time leave as is.
IMPORTANT: once its been on your site for a while, changing it will disrupt SEO/Google searches and if anyone has linked to the page’s old address the link will fail. - [yellow] Parent: if this is a “sub page” (e.g. About Me has two sub pages) under ‘Page Attributes’ choose the appropriate ‘Parent’ page – otherwise leave as ‘no parent’
- [red] Update or Publish: this saves any changes you’ve made – so always do this when you have finished editing a page
- [purple] Edit page: this is the area you can type into and add pictures etc.
See topic “Edit a Page or Post” for how to edit the content.

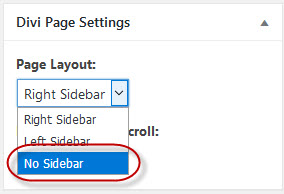 You will also have to turn the sidebar off for most pages. Use the Divi Page Settings (top right of your edit screen) …
POSTS are used for your video tips
- Click on ‘Posts’
- Click on ‘Add New’
Refer to picture below for these:
- [green] Post Title: enter a name for this post
- [red] Publish or Update: this saves any changes you’ve made – so always do this when you have finished editing a post
- [yellow] Permalink: this is the post’s “address” or “URL” and what people will see at the top of their browser. So if it’s too long you can edit it to make it simpler. IMPORTANT: once its been on your site for a while, changing it will disrupt SEO/Google searches and if anyone has linked to the post’s old address the link will fail.
- [purple] Publish date: Your videos/posts will automatically get sorted in date published order. So perhaps enter the date you published the video to Facebook.
- [purple] Categories: Tick ‘Tips’ category – otherwise it won’t get displayed in the list of video Tips
- [purple] Featured Image: create an image to use – perhaps a screenshot from the original Facebook video (see next help item) – remember to enter ‘Title’ and ‘Alt Text’ – can be used for SEO
Finally, to enter the actual Facebook video, simply copy and paste it’s address into the content area and press return/enter
See topic “Edit a Page or Post” for how to edit the actual content.

If you get a sidebar appearing, turn it off using the Divi Page Settings (top right of your edit screen) …
- Click on ‘Appearance’
- Click on ‘Menus’
- Select the menu you want to edit first and click ‘Select’
- Add your new menu item:
- To add Pages or Posts: Tick the page you want under ‘Pages’ or ‘Posts’ (choose ‘View All’ if you can’t immediately see it)
- To add a Link (to another site): choose ‘Custom Link’ and fill in the address/URL and the text that will be displayed
- Click ‘Add to Menu’
- Click and drag page to the relevant place
- By default the page title is displayed in the menu – however, you can change what is displayed by clicking down arrow to right of name and editing what is displayed in the menu
- REMEMBER to click ‘Save Menu’ button when you’re done

This is the Main Menu at the top. Notice how some pages are sub pages (indented) under a “parent” page.
Anything missing from here?
If you notice anything missing from here or have any problems with anything please let us know. We are committed to you being in control of your website as far as is possible and where appropriate.
Personal links
These are not live links – to use them, copy and paste them into your browser address bar
You are responsible for keeping your login details
Your website: https://www.space-works.co.uk/
To edit your website: (your ‘dashboard’ – requires login) https://www.space-works.co.uk/wp-login.php?
Your webmail: (to check any website emails online – requires login) https://www.space-works.co.uk/webmail